The comprehensive guide to removing, constructing, and repairing popcorn ceilings
The comprehensive guide to removing, constructing, and repairing popcorn ceilings
Popcorn ceilings, also known as acoustic or stipple ceilings, were a popular choice for residential homes from the 1950s through the 1980s. Their textured appearance, resembling popcorn, was favored for its ability to hide imperfections and its sound-dampening qualities. However, today, many homeowners find them outdated and are looking to remove, replace, or repair these ceilings. This comprehensive guide will walk you through the process of dealing with popcorn ceilings, from demolition to reconstruction and repair.
Understanding Popcorn Ceilings
History and Purpose
Popcorn ceilings gained popularity post-World War II due to their cost-effectiveness and ease of application. They were often sprayed on using a mixture of white paint and a texturizing agent such as vermiculite or polystyrene. This technique not only covered flaws in the ceiling but also helped to muffle noise, making it ideal for multi-story homes and apartment buildings.
Health and Safety Concerns
One of the primary reasons for the decline in popularity of popcorn ceilings is the health risk associated with asbestos. Asbestos, a hazardous material known to cause lung disease and cancer, was commonly used in popcorn ceiling mixtures until it was banned in building materials in 1978. Homes built before this date might still contain asbestos, necessitating caution during removal https://tymoffs.com/guide-to-removing-a-stucco-ceiling-a-comprehensive-diy-approach/.
Demolition of Popcorn Ceilings
Assessing the Need for Removal
Before embarking on the removal process, determine if the ceiling contains asbestos. You can purchase a testing kit or hire a professional to take samples for analysis. If asbestos is present, removal should be conducted by certified professionals to ensure safety.
Tools and Materials Needed
- Plastic sheeting and painter's tape
- Safety goggles and masks
- Spray bottle filled with water
- Scraper or putty knife
- Ladder
- Sanding pole with fine-grit sandpaper
- Drywall joint compound
Step-by-Step Removal Process
-
Preparation: Clear the room of furniture and cover the floors and walls with plastic sheeting to protect them from debris. Wear protective gear to avoid inhaling dust.
-
Wet the Ceiling: Use a spray bottle to lightly mist a small section of the ceiling with water. This helps to soften the texture and reduce dust.
-
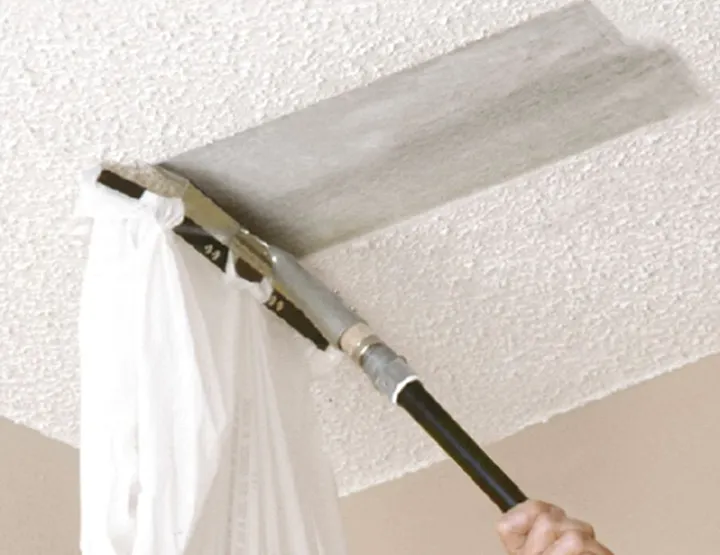
Scraping: Gently scrape off the popcorn texture using a scraper or putty knife. Work in small sections to prevent damage to the drywall underneath.
-
Smoothing the Surface: Once the texture is removed, sand the ceiling with a fine-grit sanding pole to achieve a smooth surface. Apply a thin layer of drywall joint compound to any imperfections and sand again once it’s dry.
-
Clean Up: Carefully dispose of the debris and remove the plastic sheeting. Clean the room thoroughly to ensure all dust and particles are eliminated.
Constructing a New Ceiling
After removing a stucco ceiling a popcorn ceiling, you have several options for a new ceiling finish:
Smooth Ceiling
A smooth ceiling offers a clean, modern look. Achieve this by applying a skim coat of joint compound to the entire surface, then sanding it to a fine finish. Paint the ceiling with a high-quality ceiling paint for best results.
Textured Ceiling
If you prefer a textured ceiling, consider options like knockdown, orange peel, or slap brush textures. These can be applied using specialized rollers or spray equipment, providing a unique finish while still hiding minor imperfections.
Drop Ceiling
For a more functional and accessible option, especially in basements or areas needing easy access to utilities, a drop ceiling can be an excellent choice. This involves installing a metal grid and placing ceiling tiles within the grid.
Repairing Popcorn Ceilings
In cases where you want to retain the popcorn ceiling but need to repair damaged areas, follow these steps:
Tools and Materials Needed
- Popcorn ceiling patch kit or spray texture
- Putty knife
- Drywall joint compound
- Sanding sponge
Step-by-Step Repair Process
-
Preparation: Clean the damaged area to remove any loose texture or debris.
-
Applying Joint Compound: Use a putty knife to apply a thin layer of joint compound to the damaged area. Allow it to dry completely.
-
Texture Application: Follow the instructions on your patch kit or spray texture to match the existing popcorn texture. This might involve using a brush or a sprayer to apply the texture evenly.
-
Blending and Smoothing: Once the texture is dry, gently sand the edges to blend the repair with the surrounding ceiling. Be careful not to over-sand and damage the texture.
-
Painting: If necessary, repaint the repaired area to match the rest of the ceiling.
Conclusion
Dealing with popcorn ceilings, whether through removal, construction of a new ceiling, or repair, can significantly enhance the aesthetic and value of your home. While the process can be labor-intensive, especially if asbestos is present, the results are often well worth the effort. By following the steps outlined in this guide, you can achieve a modern, updated look and ensure the safety and comfort of your living space.